Dirty Tricks. (Part 2)
During my apprenticeship, all the finishing chores fell to me. That includes all the surface preparation, touch ups, color matching, and staining, as well as all the things that happen once you begin to put actual finish on the piece.
I hated that aspect of the work while I was still learning, but it was an incredibly significant bag of skills that I really wasn't giving the proper respect. The ability to make problems disappear, to read color and pattern and grain, to do all the tiny little things that can make a surface sing is something that I've found to be incredibly rare. There are millions of talented woodworkers - I'm always amazed by how many of them don't know a damned thing about finishing.
My old boss, John Fischer (no link - crazy ol' coot doesn't have a website!), used to call a lot of those little things, "dirty tricks." There's something on every job, some tiny little bit of tearout or some anomaly in the grain, or an imperfection or a mistake, whatever - there's always something that needs to be fixed, touched, made to disappear, and that often has to happen before the finish goes on. The skills I learned in doing that for John have proven themselves invaluable over and over again throughout my career.
And the massive crack that I showed you on my last post was going to take every single bit of skill and trickery that I had amassed, over years of dirty tricks.
After being told by the client, in no uncertain terms, that I had to find a way to make that crack disappear, I was pretty distraught. Even discounting how expensive that particular board was or how much work had gone into it thus far, you have to remember that everything on the cabinet is matched from slabs cut consecutively from the tree - you can't just swap out one board and get on with your life. We would have had to almost start the job all over again.
Not an option.
So I did a little research, and found that a lot of the guys who do big slab work will often just fill in the cracks with more wood from another board of the same species. It looks coarse to me, amateurish - the grain doesn't line up, the color is slightly different, it makes the crack stand out from the piece. When the piece is intended to be rough or rustic, or even based on the philosophy that you don't intrude on the "natural beauty" of the wood, that's fine, it doesn't look too bad, but it's not for me.
I tend to get more involved in my projects, I like to get deeply intimate with the material, and there's a relationship that develops between me and the tree. I know it sounds corny, but it's there. I've used this analogy before, but it's really the best I can describe it - working with an organic material like wood can be like I imagine taming a wild horse to be. You carefully push it a little farther than it will allow, and then back off a bit and let it push back, and keep doing that until you've created a relationship that is deeply intimate - until you know each other so well that you can ask it to do things it wouldn't normally do.
So I figured I was going to try to fill this crack with walnut, but a)I wanted to do it differently that most would, I wanted to really try to find a way to make it disappear, and b)I had to quickly grow intimate with this particular board - remember that Kate was the one working with it, not me. My relationship with this board was fairly distant, I was watching and reading it over Kate's shoulder and knew some of its little secrets and certainly some of its quirks, but I had no relationship with its growth patterns and its personality. Again, I know that sounds weird, but it's part of working with wood on this level - the events that shape a tree's life, the ways in which it grows, have a profound effect on the way you work with it. You can only cut the grain in one direction, or you'll tear it out instead of cutting it cleanly - but that direction changes and has a rhythm and a flow all its own within each board. Learning that rhythm is a part of developing a relationship with the board.
I spent some time with the board, really analyzing and inspecting it from every angle, learning to understand the patterns that made the crack happen. And I started to get a sense of how I could make my little plan work. Once I began working, it was going to be a no stopping fly by the seat of my pants reading and reacting on the fly type of experience.
So. The first thing I did was to take a pencil rubbing of the crack:

I wanted to be able to reproduce it exactly. If you recall, I mentioned that the cabinet is made from three consecutive slabs. What I had realized in analyzing the situation is that we had the board that was cut from the tree immediately next to this one, the adjoining faces were almost identical. And we hadn't used the part of the next board that corresponded to the cracked section of this one.
So once I had a pencil rubbing of the crack, and some marks to align exactly where on the board it came from, I was able to find the exact same spot on the adjacent board, and glue the rubbing down on it (backwards, because it's a mirror image!), matching the grain patterns perfectly, creating a positive image of the negative space left by the crack.
Next, with my bandsaw table tilted slightly, I carefully cut the "crack" out of that board - the table is tilted so that the piece I'm left with is a wedge, that can be pushed down into the crack, getting tighter as it goes. That piece needs to be perfect, so I then take it to the crack and fit it, very gently and carefully shaving and shaping it until it's a dead on match. It's finicky work, the little piece is very thin and fragile, and one wrong move will ruin my only chance to get this right.
Once satisfied that it's a perfect fit, now I have to find a way to hold everything in place, and keep the board from splitting further. For that, I have to cut some joinery out of the underside of the board, and it will have to go deep, so that it's effective. So I clamp the board flat and cut out a bowtie shape that will hold the crack together once everything gets glued. We call these, "butterflies" - they're cut out, traced onto the place they're going to live, routed freehand, and then chopped to their final exact shape with a chisel and a steady hand. Once everything is clamped flat, it can't be unclamped again until all the work is finished, so I have to make a beam for the top surface that has a cutout in it, to allow me to slip the new piece into the crack without taking the clamps off.

Once those are fit and ready to go, it's time to glue it all up at the same time - the whole operation is a process that takes several hours of setup and preparation - once you start, you can't stop until it's done.
First, the crucial piece gets glued in and clamped up tight - it's extremely fragile, so the crack is wedged open as the piece gets slipped in carefully:

Then, it must be trimmed a bit so that the board can lay flat when turned over for the next step. Epoxy is dribbled into the crack from the underside, the butterflies are hammered in, and the remainder of the crack is filled with little wedges to fill it all in (you can see the trimmed offcut of the repair piece laying off to the side with my tools):

With everything clamped in place and glued up, and all the excess glue cleaned off, and everything checked, checked again, and inspected for any last adjustments, then you drink. Heavily.

Everything sits like that for 24 hours. At that point, the clamps and the beams come off slowly, with much praying and listening carefully for the horrible horrible sound of another crack, and then everything has to be trimmed and planed flat and flush to the surface.
The butterflies and extra crap jammed in on the underside (this part doesn't have to be pretty, just smooth and flush):

And then the repair (click to see closer):
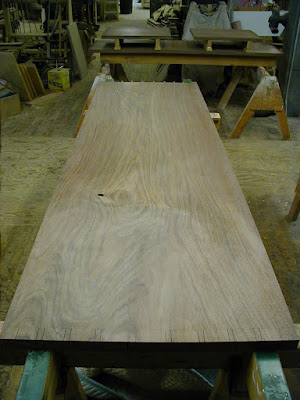
With all that done, the entire board has to be planed square again, and trimmed, so that Kate can re-cut the dovetails properly - that center tail will now be 3/16" bigger than the others, because of the new shape of the board. A small price to pay.
Months later, after the first coat of oil goes on, any anomalies in the grain and color of the repair are carefully painted in with alcohol stain, in between layers of finish.
The end result was as good as I believe is humanly possible - I was satisfied and the client was thrilled. Can you see it? Yeah, if someone points it out to you and you look very closely, you can. But then it becomes a great story for the client to tell, and it is forever a part of this piece made from a living thing.
I realize this was an exceptionally long and boringly detailed post, but the point of it all is to show just how much work can go into one tiny little step in the overall scheme of making a piece. This is not a unique experience in that way - this is what my work is, this is what I do all day, every day.
And it's what any artist must do - for every beautiful thing you've ever seen, there is blood and sweat and passion and fear behind it.
And I wouldn't have it any other way.
posted by sb at 12:32 PM
![]()
![]()

5 Comments:
This was good. I'm not sure why you thought it was long and boring.
And as to crazy old coots that don't have websites, why don't you integrate your blog and website together?
A good read
Awesome series of posts. I agree with Corman, adding this to your website would be great. Then, when you work on someone's piece, you could write posts about it (only the notable ones, naturally). After you're done, you print out the story, sign your name, give it in a plaque or something.
Your clients aren't only buying a piece, it's a story (and here it is). Best of all, you get to charge more!
Again, awesome posts and keep up the great work (both the posts and the woodwork).
What's the problem here? A touch of walnut putty, hit 'er with the orbital sander and you're good to go. That's why you write a clause in the contract that you're not responsible for seasonal movements of the wood. If the customer complains, you give some sort of bullshit excuse. Probably though, the customer won't notice until it's far too late.
And the fact that the above paragraph is the antithesis for everything that you stand for and practice - that is what makes this so inspirational. Thank you thank you thank you for sharing this. As a student of humanity, reading this is pure gold. As a student of woodworking, this is priceless.
-Nathaniel
Thanks for a good laugh, Nathaniel - that cracked me up.
Post a Comment
<< Home